So, for a few months now I've been scrolling through Pinterest and I always seem to come across some type of pallet project. Most of the ones I saw caught my eye and I thought they were really cool. I decided that it was time for me to make my own diy pallet project. So here are directions on how to your own make a pallet chair! :)

Materials:
- One pallet
- Two 2 by 4's
- Box of 1 1/2 inch exterior screws
- Box of 2 inch exterior screws
- Four metal braces
- Four wooden legs
(Optional:)
- Indoor/Outdoor wooden stain
- Two brushes
- 100% polyester filling
- At least 2 yards of fabric
The first thing I searched for was my lumber. I didn't want to pay for a pallet because I knew I could get them for free somewhere. Luckily my Uncle had some leftover pallets that i was able to use. Score? He also let me take anything out of his pile of scrap lumber so that's also where I found my chair legs. I had some leftover 2 by 4's at my house from previous projects so the total for lumber cost was $0! I bought all of my non-wooden materials at Lowe's, besides the filling and fabric. I found those at AC Moore. Most of the materials were pretty inexpensive, so the grand total cost was about $55 dollars to make.
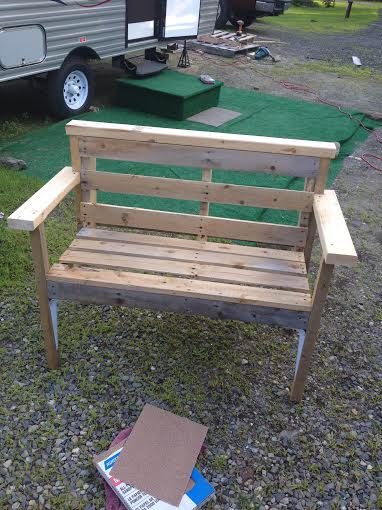
To start of we had to pull of every single wood plank so we could cut and rearrange them. That was probably the hardest thing to accomplish! After the torture of pulling wood planks was over, it was time to cut. What really sucked was that we wanted our cushions to fit just right, so we had to cut of the length and the width. We made our measurement for the bottom half of the chair and sawed part of the pallet off. After, we sawed all the planks to the same measurement to the pallet and screwed them back in. Here's a helpful tip: if you have to rip the wood planks out like we did, make sure you screw them back in instead of nailing them. Nails have an easier time falling out and will rust faster than screws.
After finishing the bottom of the chair, it was time to put the legs on. I wanted my chair to be as much of the ground as a normal chair, so I measured one of my dining room chairs. The legs were probably the easiest part of the job. Then came the leg braces which took no time at all to screw in. But then came the fun part, the top.
So we basically started the top as we did the bottom. Pulling out planks, cutting the pallet, and screwing them in. Here's where the challenge started. I wanted the back to be tilted slightly, so it would be more comfortable. I mean c'mon, who sits at a 90 degree angle. This meant we had to cut those three inner board of the pallet ( you know, the ones that the wood planks get screwed into) at an angle. We left some wiggle room on the width of the bottom half so the top half could be placed on it. Once we had that screwed in we also had to screw it into the legs ( I made my chair legs go up above the bottom so my top half would have something to screw into.) The hard thing about this was that the legs were completely straight. We managed to do it though, and it didn't look bad!
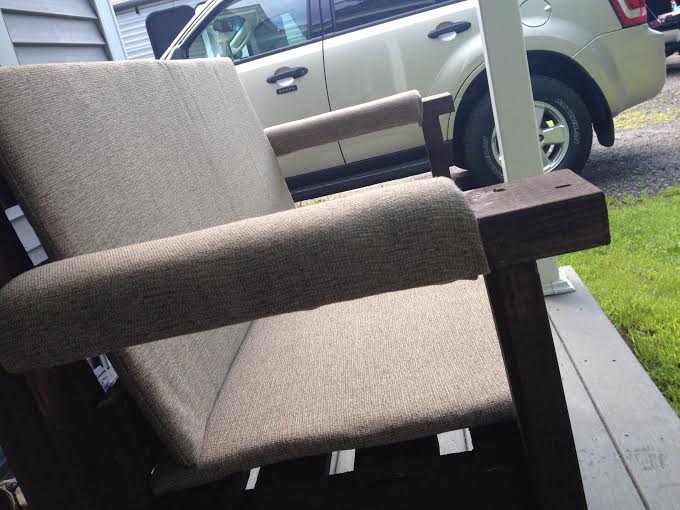
Last but not least came the armrests. This part was super easy. The armrests were made out of 2 by 4. All we had to do was screw them to the top of the leg and the top half of the chair! With the left over 2 by 4 we decided to add some "style" and cover up some rough spots!
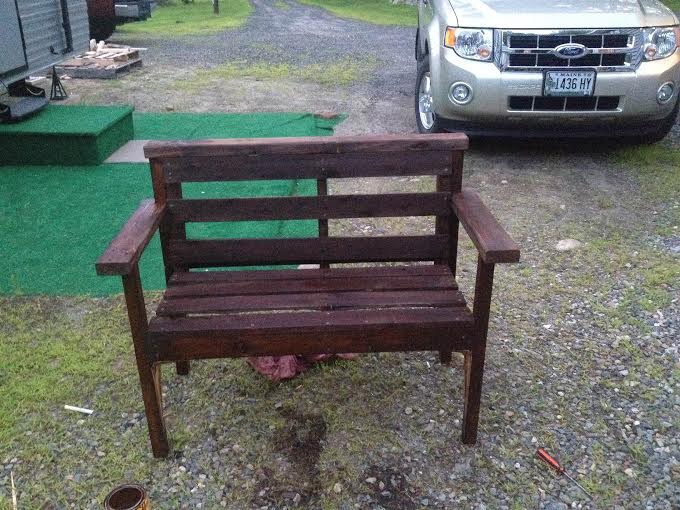
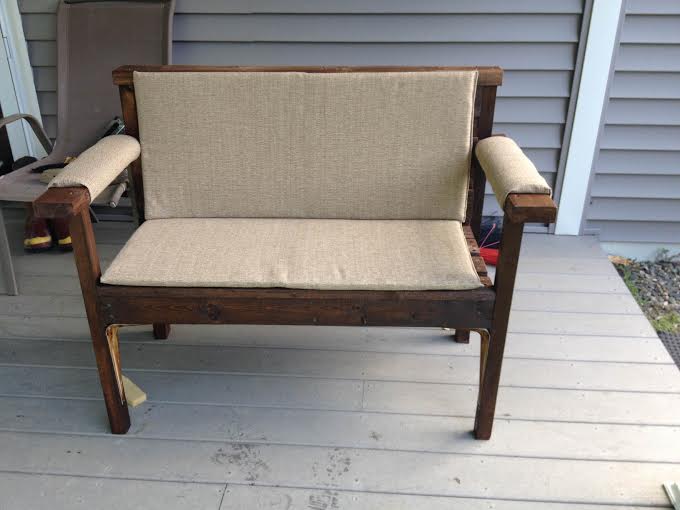
Viola! Your Pallet chair is finished! :) Now if your like me just having a plain, blah-looking pallet chair isn't enough. I stained mine a dark chestnut color to help the different types of wood blend together well. Then we sewed some cushions with the filling and fabric I bought and stapled on some fabric wrapped foam for armrest cushions.
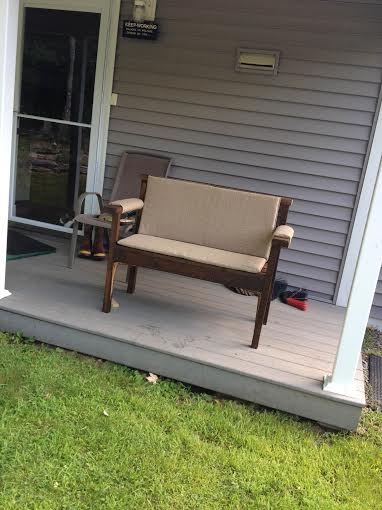
So, how do you think it turned out? :)
- One pallet
- Two 2 by 4's
- Box of 1 1/2 inch exterior screws
- Box of 2 inch exterior screws
- Four metal braces
- Four wooden legs
(Optional:)
- Indoor/Outdoor wooden stain
- Two brushes
- 100% polyester filling
- At least 2 yards of fabric
The first thing I searched for was my lumber. I didn't want to pay for a pallet because I knew I could get them for free somewhere. Luckily my Uncle had some leftover pallets that i was able to use. Score? He also let me take anything out of his pile of scrap lumber so that's also where I found my chair legs. I had some leftover 2 by 4's at my house from previous projects so the total for lumber cost was $0! I bought all of my non-wooden materials at Lowe's, besides the filling and fabric. I found those at AC Moore. Most of the materials were pretty inexpensive, so the grand total cost was about $55 dollars to make.
To start of we had to pull of every single wood plank so we could cut and rearrange them. That was probably the hardest thing to accomplish! After the torture of pulling wood planks was over, it was time to cut. What really sucked was that we wanted our cushions to fit just right, so we had to cut of the length and the width. We made our measurement for the bottom half of the chair and sawed part of the pallet off. After, we sawed all the planks to the same measurement to the pallet and screwed them back in. Here's a helpful tip: if you have to rip the wood planks out like we did, make sure you screw them back in instead of nailing them. Nails have an easier time falling out and will rust faster than screws.
After finishing the bottom of the chair, it was time to put the legs on. I wanted my chair to be as much of the ground as a normal chair, so I measured one of my dining room chairs. The legs were probably the easiest part of the job. Then came the leg braces which took no time at all to screw in. But then came the fun part, the top.
So we basically started the top as we did the bottom. Pulling out planks, cutting the pallet, and screwing them in. Here's where the challenge started. I wanted the back to be tilted slightly, so it would be more comfortable. I mean c'mon, who sits at a 90 degree angle. This meant we had to cut those three inner board of the pallet ( you know, the ones that the wood planks get screwed into) at an angle. We left some wiggle room on the width of the bottom half so the top half could be placed on it. Once we had that screwed in we also had to screw it into the legs ( I made my chair legs go up above the bottom so my top half would have something to screw into.) The hard thing about this was that the legs were completely straight. We managed to do it though, and it didn't look bad!
Last but not least came the armrests. This part was super easy. The armrests were made out of 2 by 4. All we had to do was screw them to the top of the leg and the top half of the chair! With the left over 2 by 4 we decided to add some "style" and cover up some rough spots!
Viola! Your Pallet chair is finished! :) Now if your like me just having a plain, blah-looking pallet chair isn't enough. I stained mine a dark chestnut color to help the different types of wood blend together well. Then we sewed some cushions with the filling and fabric I bought and stapled on some fabric wrapped foam for armrest cushions.
So, how do you think it turned out? :)
 RSS Feed